More quilt progress

I've made good progress on my daughter's quilt!
I laid out all the squares in a pattern..

And slowly stitched them all together..

I'm pleased with my progress and think I might yet get it finished this week!!
Yippee!!

Another quilt! - progress

Last year I made my first ever quilt - for my younger daughter.

I learned a lot along the way!
Since then, I've had another bag of similar fishy fabric scraps that I was given - just waiting for me to whip up another quilt for my older daughter!


Finally I've made a start!
I've cut lots of squares - ironing and cutting from the misshapen scraps I was given!  And I added some plain colours to match too!

I've also got a pile of old blankets - and baby rugs that I made years ago, from which I will cut the fleece to use as  the batting for the quilt.

As to the backing and the binding, I've not yet decided - I'll make up the quilt first, then I'm sure there'll be something in my stash that I can use!!

This project has been waiting a LONG time to be done - so I'm on a mission to finish it this week!

Have I bitten off more than I can chew?

I'll post more tomorrow and let you know!

How to make a simple tote bag in 5 steps and 15 minutes


This last weekend my youngest daughter had another birthday party to go to, so I made the birthday girl one of my 
 (like these:)

I decided to make a bag to give the gift in rather than using wrapping paper.


Here's how to make your own super simple tote bag - in just 5 steps and 15 mins!

You will need:
2 pieces of fabric - one for the inside of the bag and one for the outside, plus a little for the straps.


Step 1: cut your fabric

Fold your outer fabric to the size you want for your bag and cut to size.
 I chose my size by folding the fabric around the notebook folder I wanted to put in the bag, and allowing a little space around it.

Then lay this piece on top of your inner fabric and cut another piece the same size:

And for the straps cut 2 strips 10 cm (4") wide and the length you want the straps to be. You can either measure another bag's straps - or drape a tape measure over your shoulder and measure how long you'd like each strap to be. Mine were 45 cm (17.5") long

Step 2: Stitch the main bag pieces

Fold each main bag piece in half - right sides together and stitch down the sides to form 2 pockets:

Step 3: stitch the straps

Take each strap in turn and iron in half lengthways:

Then open out and fold each half in towards the fold. Iron again:

Finally fold in half again so the raw edges are hidden and iron:

Then top-stitch (stitch close to the edge) down both sides of both straps:

Step 4: Attach the straps to the main bag:

Turn your outer fabric 'pocket' piece right sides out, then pin each strap to one side matching raw edges to raw edge and placing the straps one on either side of the bag like this:

Stitch into place:


Step 5: Stitch inner and outer fabric together

Slide the inner fabric pocket into the outer pocket like this:

Then turn the top edges in towards each other to hide the raw edges and pin the two fabrics together around the top.


Then top-stitch all the way around the top of the bag:

All done!


For the downloadable PDF version of this tutorial, click here.


You can make this bag whatever size you like and use any kind of fabric.
More eco-friendly than wrapping paper - and it's like giving an extra gift!


For more super simple tutorials that anyone can sew in just 5 steps and 15 minutes go here!

Or for over 100 more sewing tutorials for all levels of sewing ability take a look at my tutorials page.


Happy sewing!


Soft toys to Slippers - an upcycle tutorial


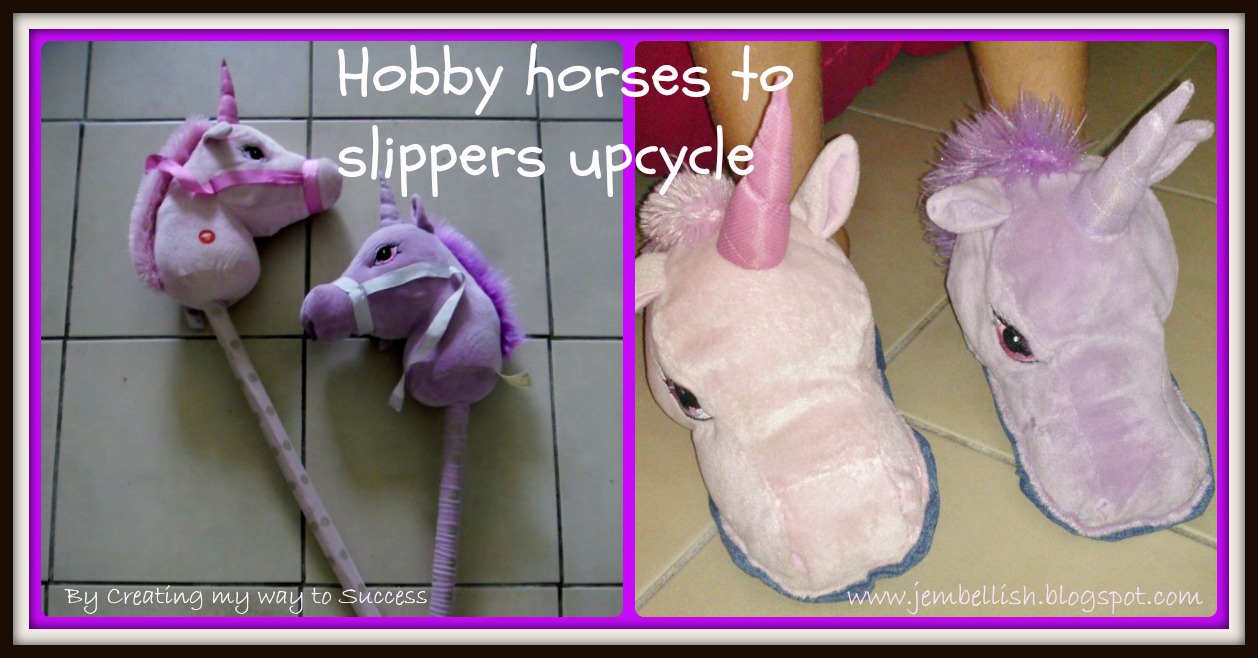
This is one of a few projects I had set myself a while ago - find something to do with these old soft hobby horses that my girls had grown out of!

The unicorns were too cute and cuddly to get rid of - so I wanted a way we could keep them - they just needed a new purpose!

So re-purposed they were - and they are now enjoying a new life as a pair of cute and cosy slippers!

So here's how to convert a pair of old hobby horses - or other soft toys, into a pair of slippers!

You will need:

2 soft toys for the top of the slippers.
Denim or or other thick fabric for the main slipper part
Foam for the slipper bases
Paper, pen, scissors and pins

First draw around the foot that the slippers are meant for:
Then cut this shape out - leaving and extra 2 cm (approx 1") around the edges. This is your slipper base template.
Cut two pieces of foam using this template:

Now cut 4 pieces of denim (or other thick fabric), 2 to cover each foam piece. These should be a little larger again than the foam pieces - allow an extra 1.5cm (approx 0.5") all the way around.

Next, with right sides facing - sew two denim pieces together, leaving a gap around what will be the front of the slipper. 


Turn this right sides out and push in one of the foam pieces.

Repeat for the other foot. You should now have two slipper bases.

Now to the cuddly toy part.  You need to cut open the soft toy and pull out most of the stuffing.  

Now place the shell of the toy over the front of the slipper to guage the size and trim the fabric to size.

  Then use the offcuts to pin around the bottom of the toy to enclose it.  Basically you want to make it the size you'd like to sit on the top of your slipper under your toes.

Stitch around the edges, leaving a small gap - then push some stuffing back in. You need enough to keep the shape of the animal - but also not so stuffed as you need to be able to squeeze the edges to stitch around them.

Once you feel you have enough stuffing in - hand-stitch the opening closed.
Now place your soft toy at the top front of your slipper bases. Making sure all the raw edges are turned in - pin the toy to the slipper around the front:


Then carefully stitch the top to the base with your machine. Run the stitches backwards and forwards several times to secure at the edges.  You may also like to use a double row of stitching for extra strength! 
HINT:  If you use your zipper foot - it's easier to stitch around the bulky edge of the toy!


And there you have a new pair of slippers - and a way of preserving old soft toys!


I only wish I'd made them my size!! 

For the downloadable PDF version of this tutorial, click here.


So tell me - what do you think???

For over 100 more free sewing tutorials for all levels of sewing ability, take a look at